Showing posts with label Whole grain wheat. Show all posts

Friday, February 5, 2016

No-flour Blender Pancakes turning Wheat to Pancakes Without a Grain Mill

So another crazy thing I do...among other things, is make pancakes from the whole grains of wheat, without flour
You read that right too. Chef approved!  This one uses soft wheat, so that you get fluffy pancakes. Soft wheat is lower in protein, so it makes delicious light pancakes. It's worth trying at least once, but I think you will be pleased with how easily they come together. 


Soaked wheat goes from soaked grains of wheat...
to these delicious pancakes!


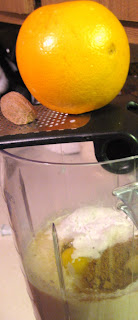
With your blender ...and some goodies. The batter cooks up just amazing!


  Chef Tess Blender Whole Wheat Pancakes


You will need:

  • 1 cup soft wheat (red or white)
  • 1 cup milk or soy milk
  • 2 eggs, or 1/2 cup egg replacements
  • 2 T cold pressed oil--or the oil of your choice
  • 1T honey (or 2 T sugar)
  • 2 tsp baking powder
  • 1 tsp vanilla
  • 1/2 tsp salt
  • dash of cinnamon, nutmeg, and orange zest
1. Soak 1 cup soft red or white wheat in 3-4 cups warm water overnight, about 8 hours.
Soft wheat has a lower protein content and will make light pancakes,while hard red works, but it is a little tricky to get a fluffy end result. I love these with soft white wheat if you can find it.
2. Drain wheat well. Don't soak longer than 18 hours, or it will be funky!
3. Put drained wheat and 1 cup organic vanilla soy milk/regular milk in a blender
4. Blend 3 minutes on Liquefy setting Leave blender on, just open the little top thing (sorry this is so technical).
5. Add remaining ingredients: 2 eggs,2 T oil ,2tsp baking powder.1/2 tsp salt, 1T honey, 1/2 tsp vanilla, dash of cinnamon, nutmeg and fresh orange zest (micro plane)Continue to blend about 2 minutes. Total 5 minutes blending. If you don't blend long enough, the wheat will be chunky instead of a smooth batter.Pour right from blender onto a hot griddle. Yields about 12 4 inch pancakes.


There you go! Try these!

Always My Very Best,
Your Friend Chef Tess


Friday, April 8, 2011

Cottage Dill Millet Sourdough Bread (100% whole grain and sugar free)


 Cottage Cheese Dill rolls are and will forever be my first love when it comes to dinner rolls and what brought me to my obsessive compulsive need to have herb bread in my life...and to the love and dear friendship of Tara  ...my Evil Twin. I have many things to say about her. All good. Good friends, like good herbs and spices are worth keeping in your life. 


 We keep herbs in our food storage. It's how we roll. Why? Well it changes a normal bland loaf of bread into something savory and full of depth and flavor. Just like a good friend changes your life into something more meaningful. A good friend gives you more character.


 So does a good grain.

 Have you ever cooked millet? Met him?  Well, don't feel oddly if you have not ever met my friend Millet. He's a cutie, but he's not very well known in America if you're not a bird lover. It's sad really. Such a lovely grain should get more attention...affection...praise...perhaps a wall sconce in it's honor? Is that too Martha Stewart? How do you make a millet wall sconce anyway? What the carp is a wall sconce?!
 I digress. In my garden I have a freak-fest of this crazy dill. Who likes dill? I mean that much anyway?! There's only so many pickles even I can make. In all honesty, the bush of dill is now taller than me. Literally over my head. It's actually getting to be kind of epic. I might start filming a whole Star Trek episode in it's honor...because every time my son sees it he says, "By captain Kirk's Nipple's! It's incredible!"  You all needed to know that.
 Yes...that is my neighbor's roof...and my dill.

 The last time I went to be on  Valley Dish I was so desperate  eager to share the love that I took  some to the studio.
Decidedly it was time to start drying some of the epic mount of dill weed...and start baking. Plus...really I just love dill in bread. I love how it makes the loaf taste. I love how it couples with tuna and cheeses of all kinds. I love it as toast. I'm in love with this bread. Gosh it's a good thing I'm married.

 So, here we go.


Cottage Dill Millet Sourdough Bread 
with Onion and Garlic
1/4 tsp yeast (optional)
1/2 cup cold water 
1 1/3cups whole wheat Prairie Gold bread flour
2/3 cup Hulled Millet  
1/2 tsp  Real Sea Salt  
I Combine all ingredients in a 3.5 Gallon Threaded Bucket with Lid . I use a bucket because I can easily use it anywhere...even camping! So I can make bread in my buckets and then bake it in my Global Sun Oven . As for this dough, cover and leave in a cool room until you are ready to bake the bread, 12-18 hours. If you will be leaving it for more than 18 hours, it may be stored in the fridge part of the time, or stir after 8 hours. This will keep the yeast happy, moving it to greener pastures and evaporate any alcohol produced by the fermentation process that would otherwise hurt the yeast's ability to raise the bread.
After 12-18 hours it will be really puffy and smell like a good yeasty bread dough. Remember to keep it rather cool during this overnight period.


Get out your liquid measuring cup...the one that is clear with writing on the side. You will also need a measuring spoon. The ones made with writing on them for baking, not just the flowers or whatever on your silver spoons...

To your bucket or bowl add 1 cup Luke warm water, 1 cup Homemade cottage cheese or store purchased cottage cheese 2 T honey and 2 tsp yeast (optional). Note: if you omit the yeast, it will take the dough about 12 hours to raise.
 Wash your hands. Now don't be scared. You will have to touch the dough. Actually you will have to really get in there and mix it up with your fingers. Break it down.


This may be my favorite part.
Woosh it around (very technical term I know) until it is smooth and batter-like. Yea. Batter-like is a word.

Now get out your whole wheat bread flour I use Prairie Gold wheat from Wheat Montana. It is by far my favorite bread wheat and flour. I don't even work for them. I grind my own (Flour making day...flour power.), but you can buy it. As long as it is fresh.Here's a peek into my flour bin. We're gettin' a little low...
Don't mock me, but I am going to show how to measure flour. Someone asked me and I don't want to assume too much of anyone reading my blog. If you are seeing this for the first time, I'm glad to help. The rest of you can just sit tight and humor me. I love everyone wherever they are in the learning process here. So here's how it's done:
Lightly scoop up the flour...don't bang it or try to pack it in there.

Get a butter knife.
Set it up on it's spine so the blade is pointed up:

Hold it flush to the top of the measuring cup and push off the extra flour so it is flat:

Like this. See?

Add 4 cups whole wheat bread flour and 1/4 cup oil (preferably expelled pressed or extra virgin) and 2 tsp salt, 1/4 cup dry minced onion, 2 T minced dill, 1T minced tarragon, 1/2 tsp fresh cracked pepper
 1 1/2 tsp fresh pressed garlic, about 1 large clove


 The dough should take only 10 minutes of efficient kneading to attain supple perfection--600 strokes by hand. Form into a ball. This makes a balloon like structure that helps hold in the fermenting gasses and helps the texture of the bread. Place in bowl smooth side up.

(From here on I'm using a few older pictures...)
Then I lightly spray the top of the dough with water. This helps it to stay moist, which ensures no lumps of crusty dough in my bread, just a nice even dough.

Keep that spray bottle around too. I use it a few times during bread making.


Get it pretty wet. Look how shiny. Oooo. I'm easily entertained.


Cover with plastic wrap and allow to raise at room temperature (75-80 degrees) about 1 and 1/2 hours. Sometimes it takes 2 hours if the room is cold. It helps to measure the temperature of the dough if you want to be sure. This can be done with a meat thermometer. This one was right at 85 degrees internal temperature so it took almost exactly 1 and a half hours. If it is cooler it will take longer.


It has raised about 2 inches from the top of the bowl. See the tiny belly button dot where I poked it with a meat thermometer?

When you just can't resist it anymore, go ahead and giggle and poke it with your finger.

If you don't have to use much effort, it gets those creases right around your finger, and it leaves a hole when you remove your finger, then it is ready to punch in the head.

So, punch it down already. Expel as much air as possible. This moves the yeast to greener pastures, releases trapped alcohol, and evens out the dough temperature. It's not just for the fun of punching something (though it is elating to punch something sometimes).


Reform into a ball and place back into the bowl. Spray with water again and cover with plastic. Allow to raise again. This time it should take about 1 hours. Less if your house is warm.


I had to show how the gluten strands are showing here. It's really something wild to see...

Like an alien in my kitchen...that we eat. Toasted. Mmm. Alien...

Okay, so cover the ET blob with plastic. In the meantime, lightly oil 2 standard size loaf pans. I also lightly coat them with a little cornmeal. I use 8inch by 4 inch almost without exception. This size makes great shaped loaves (see:Sandwich Loaf Molding and baking for more details on this phenomenon).


Once the dough has risen to within 2 inches of the top of the bowl again, or passes the finger poke test (yea, I know, not again a technical term). The actual technical term is the "ripe test". Just poke it. It works...
Take the dough out of the bowl and place on a clean counter top that has been lightly misted with WATER.

Why did this picture just make me giggle with joy? I'm either really nuts or really love bread. Not sure which... Please look at this and find joy...
Mmm. Dough. Okay. Now get giddy crazy and divide the dough in half. It should look like this if you get on your knees and peek up over the edge of your countertop...

Now go here: Sandwhich Loaf Molding and baking . It will lead you in all things right and good with makig this bread into a sandwich loaf. Go ahead now. Don't be scared. I will still hold your hand and walk with you.

The killer delight is the millet nibbles. They just make me giddy. Oh millet. I love theeeeeeee.

Look at all that crusty delightfulness. Don't you just want to make some right now?!

There you go.

Saturday, April 2, 2011

How to Make English Muffins


 I wanted to show a little bit of fun with something that seems to be one of those "lost arts". English Muffins. I promise if you can make bread dough, you can make these. It's not rocket science. I have found a few tricks and have also found this recipe to be pretty good for light fluffy muffins. Auntie Em sent me a recipe book that had this recipe in it, and the directions. My mouth dropped when I saw how easy they were. Why had I not been making them for years?! So, I started practicing. I love this recipe, I do however also use the overnight started bread dough for these too, and it works really well for great flavor. Make the dough as usual and when it comes time to shape into loaves, shape and cut into English Muffins instead.
Cinnamon Raisin English Muffins
3 cups bread flour (if you use whole wheat, add about 1/4 cup more liquid)
1 teas. Salt
1 T. Dry yeast
1 teas. Sugar
1 cup Warm milk (I have a friend who uses buttermilk...mmmm)
1/2 cup raisins (optional. apparently some people think raisins are "of the Devil")
1T cinnamon (I add clove, ginger, and nutmeg as well)
2 oz. Butter, melted

Sift the flour and salt into a bowl and leave in a warm place. Dissolve the yeast and sugar in warm (105 F) milk (M−Waved). Let froth, then mix in the butter. Stir all the liquid into the warm flour and beat well until smooth and elastic. More complete directions for forming dough and proofing can also be found in the overnight started bread tutorial. Cover and proof in a warm place for 50 minutes or until doubled in bulk. Turn onto a well−floured board and
knead, working a little more flour if necessary to make the dough easier to shape. Round up the dough, roll into a thick sausage shape. I use a lot of flour to coat these. Some people don't like to do it that way but I think it makes them look really cool...and not stick to my counter tops. Always a plus.
Using the sharpest knife you have, slice into 8 to 10 portions, each about 1 1/2
to 1 3/4 inch thick. Shape each one into a round with straight sides
I usually score my bread with the knife so I know what the heck I am doing. Really scientifically calculated too(...oh come on). It sounds smart. I just eyeball it. It should make about 10. I doubled the recipe so if it looks like I got a ton... I did. My kids love them.
Put onto a greased baking sheet. Personally, I love the cornmeal coating so I lightly (very lightly) mist the pan with a little oil and then sprinkle it with a good coating of cornmeal. Then I put some cornmeal on the top of them too. Cover (use plastic wrap) and put in a warm place to proof for 30−40 minutes or until springy to the touch. Leave room for expansion and be careful not to over−proof, as the muffins will get flabby and lose their shape. Big words for saying..."don't let them get super pooofy". I know a lot of things that get too poofy and lose their shape. NO comments on my thighs. None. Random moment there sorry.
The cornmeal on top keeps it from sticking to the plastic while it raises. Sorry I didn't get a picture of the plastic wrap covering the muffins. You will just have to use your imagination.

Lift the muffins carefully onto a cast iron skillet or a thick bottomed skillet (like the 12 inch Lodge 3 Quart Red Enamel Casserole Dish --I love mine...but it's blue or the Lodge Logic Deep Skillet  would also work.) and cook over very moderate heat for 5-7 minutes until pale gold underneath. Turn and cook the other side 5-7 minutes as well. Moderate heat for me was medium heat (#4 on my dial) but every stove is different, so try not to get it too hot. It took me about 40 minutes to make all of mine. We made 20. Days like that I wish I had an electric skillet or something. However, it did make me think that if I was camping...I could totally make these since they don't need an oven!


One secret I found to getting them to bake really well, was to use a tight fitting lid. Oh...and if you can, dump out as much of the stray cornmeal as you can between batches. It will burn a little and add a not-so-amazing flavor.

Enjoy. Wrap in a cloth and keep warm if cooking in batches. To serve, insert a knife in the side, pull the top and bottom slightly apart,and insert slivers of butter...or just crack them open and dig in.

There you go. Happy Muffin making.