Wednesday, March 9, 2011

How to Use Your Dutch Oven to Bake Pie


I wanted to share a little from the class I co-taught today at Preparing Wisely . I was all about the Beginner's Pie Crust and gave some basics on how to actually make the pie. Troy Adair, amazing emergency preparedness guy of glory was there to teach some basics on how to turn a regular outdoor dutch oven into a baker for pie. I was most interested in learning myself how to know that the oven was the proper temperature for baking. Since, y'all know I'm a bit of a baking geek...right? Why bake it in a Dutch oven at all? You know, I'm all about alternative cooking methods and I adore solar baking all summer and winter, but I'm also looking at the fact that my son Little Man will soon be attending BSA camps. I'm getting my game on to cook in the rough...should I ever need to assist in that area. Plus, will I ever be sad I didn't know how to cook something another way? Nay. I dare say I will always be a cub master-chef...even now as I'm not a cub master any more. I can also do a yodeling goat on the mountain impression and sing,"Be prepared! Be prepared! This lesson must be shared..."
It turns out there is a very technical way of knowing the internal temperature of a dutch oven. We used the Lodge Camp Dutch Oven 14 Inch deep dutch oven. It was just about the perfect size for a 9 inch pie. To determine the temperature of the oven, you use what is called, "the rule of 4." If the oven is 14 inches, you subtract 4. You will need 10 coals on the bottom of the dutch oven and twice that many on top of the dutch oven to get the internal temperature to 350 degrees (preheating 20 minutes). Adding 5-7 minutes to the baking time on most items. Add two coals to the bottom and 4 to the top for every additional 25 degrees you want inside your oven. So...for 400 degrees we added 4 to the bottom and 8 to the top. Does that sound technical enough? It almost hurt my brain to do that much math.

Once hot, Troy used a metal hook to take off the lid, with the coals still on top:


Single layer pie crust for a custard pie takes about 25 minutes.

Oh...this is important, we put the pie on top of a metal trivet inside the dutch oven so the bottom didn't burn. This also applies for most other pans you are baking in the dutch oven. Leave a little circulation space under the item's pan so it isn't in direct contact with the dutch oven. This is why we used the deeper dutch oven (5 inched deep instead of 3 inches deep).
A fruit pie generally takes about 45 minutes to bake (50-55) in the dutch oven.

The crust was golden delicious.

For the filling we used freeze dried peaches, raspberries and blueberries, reconstituted and lightly sweetened with agave. The general rule with thickening fruit is this:
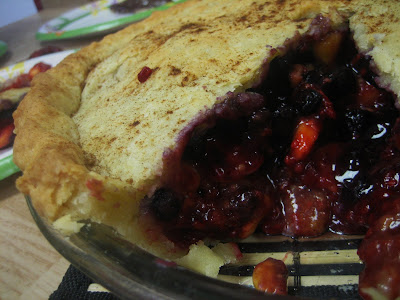
4 cups of fruit mixed with 1/4 cup corn starch or ultra gel and 1/4 cup agave nectar. We also added 1 tsp of Chef Tess Wise woman of the east spice blend.
Now I'm ready to go camping! What about you?! Who wouldn't love pie in the mountains?
There you go. Dutch oven baking. We're starting with pie...but bread is next!

Tuesday, March 8, 2011

Sometimes I do some simple basics, not only because we live on simple basics around here, but also because I know a lot of cooks who need the basics. Any student needs the basics in order to have a good foundation. This one is for my beginners. I love you guys! Cream of Wheat made from the whole grain at home, is nutritionally the best option. I think the flavor is off the charts. There isn't a hint of bitterness from rancid old ground wheat if you make it fresh. It's sweeter from the fresh wheat. It has all the benefits of whole grain! I know my kids are more apt to eat it if they help grind it. It's a funny thing. The other plus? Hard White Wheat Berries Organic 25 lb Bag for 40$. That makes 15 servings of hot cereal per pound. How's that for cheap healthy eats?! This same method can be used for any of these:
 Rye Berries Organic 25 lb Bag
 Spelt Berries Organic 25 lb Bag 
 Spelt Berries Organic 5 lb Bag
 Pearled Barley 2.5 lbs 

Here's my hand grinder.WonderMill Junior Deluxe 
WonderMill Junior Deluxe

WonderMill Junior Deluxe

:
I love hard white wheat, but red would work here. You could also add other grains like barley. Malt-o-meal is just that...barley and wheat. They toast the barley before they grind it.
I grind it once on a rough setting. If I cooked it at this point it would be called "cracked wheat". It's much more coarse, but a wonderful texture.
I run it through the mill on a finer setting. Did I mention my kids love to watch this process? Especially if I say things like "stop...save me! I'm too devastatingly beautiful to be put through the grinder". They laugh hysterically.
At this point, it looks like commercially prepared cream of wheat.
I like my cream of wheat not too thick and not to thin. Call me Goldie-locks. It takes 1/3 cup of the cream of wheat to 1 cup of water. I also use a pinch of sea salt.
Bring the water and salt to a boil. Add the cream of wheat in a stream, whisking with a whisk. Stir for 5-7 minutes until thick. It will look like this...
Serve with honey and cinnamon if you want or enjoy the savory version with pepper and butter.

Simple basics. There you go.

Monday, March 7, 2011

Using Your Sun Oven as a Slow Cooker 101

Today we used my Global Sun Oven just like a crock pot.  Most often that is how I use it but today felt especially cool after the seminar  on Saturday.  A lot of people are surprised to find that the Global Sun Oven can be used as a slow cooker using the insert from their crock-pots! At the Solar Cooking Seminar with Paul Munsen, (President of Sun Ovens International, Inc.)he  told us a few things that are less known about using the solar oven. I realized I had already been using it for my crock pot but when Paul said it...I just felt so cool. Like, "hey...I thought of that too..."  The cooking times with the slow cooker recipes is exactly the same as the "low" setting. So, any recipe you have for the slow cooker...can be done solar. 

For this recipe we used : 

Quick and Easy Slow Cooker Chili
1 lb cooked hamburger or equivalent of the 
Honeyville Freeze Dried Ground Beef 
(or vegetarian use 1 cup TVP Taco )
1/2 cup  Dehydrated Onion 


Add to the following in a 4-6 quart slow cooker:
1 small can diced green chiles
2 15 oz can Pinto beans ( undrained) or 1 lb cooked pinto beans
1/2 cup dehydrated bell peppers
2 cans stewed tomatoes or diced tomatoes (undrained) *
2T-4T chili Powder (depending on how hot you like it)
1T garlic
Salt and pepper to taste

Heat in the solar oven 2-3 hours in direct sunlight. Serve with tortilla or corn chips. Optional, top with grated cheese, sour cream, diced onion and even fresh diced tomatoes if you like.


You will need to remove the metal shelf within the unit and just put the pot right on the bottom of your cooker.

This is a six quart insert that fits just perfectly in the Solar oven.  I keep it on a rolling Craftsman Tool cart that has been a perfect perch for my oven out in the sun.


Chili cooked perfectly in the solar oven instead of using the electricity and heating up the kitchen! How cool is that?! In Arizona, the cost of cooling my house goes way down if I don't use the regular oven and the slow cooker on the kitchen counter. The solar oven has offered a great alternative method for cooking that my family loves.


E-mail a friend about this product. 


Would you like to receive our weekly email with updates on our upcoming events and store specials? It's free...and its fun!  Contact Troy Adair:  troy@preparingwisely.com 

Saturday, March 5, 2011

Solar Powered Cooking Seminar "Notes"


It's not every day that one get's to rub elbows with an international humanitarian and solar cooking guru like Paul Munsen. Today we had the rare opportunity to have him here in Mesa teaching a seminar on Solar Cooking for Preparing Wisely! It was not only educational, but exceptionally fun! 

Paul started the bread in the solar oven about 45 minutes before he started the class.  Then we got him to get some photos with Troy!  I think the matching beards are a nice touch.  
here's the video from www.sunovens.com 
 The Ultimate Solar Appliance

Tips for making a lot of Cookies in a Global Sun Oven at once...


One thing people often struggle with, is the limited space inside the Global Sun Oven. However, one of the amazing things about the Global Sun Oven is that the cooking airflow is much like a convection oven in how well it evenly heats food.  Say goodbye to burned bottoms of cookies.  It won't happen. Cookies are in fact, one of the few things that can be burned in a solar oven due to the high fat and sugar content of most cookie dough.  Cooking time needs to only be adjusted by 7-10 minutes. So, if a recipe calls for baking at 350 for 10-12 minutes, you will need to bake them in the Global for 17-22 minutes. When the surface of the   appear dry, the cookies are usually done.
If you use a pan sized 11x7x1.5 inches, you can fit eight small cookies to a pan. You can then stack them in the solar oven!


 Where do you get your recipe for ? 

May we suggest: Chocolate chip cookies of love. 


If you stack the pans in the Global Sun Oven, you can get 3-4 pans in there at a time, that's three and a half dozen baking at once.  Now...I don't know about you, but that might be about equal to how many you can fit in your regular oven!


That is a sweet reason to pick up a solar oven...especially since it doesn't heat up your house to make cookies, right?!

Friday, March 4, 2011

Tips for Using Your Global Sun Oven

DON'T DELAY......USE THE GLOBAL SUN OVEN TODAY!
sun_oven_new

The Global Sun Oven is the industry standard for solar oven cooking.  In my experience, no other sun oven heats up as well, maintains its heat as well or cooks food as well as the Global Sun Oven.  There are several key elements to the construction of this unit.  First, this unit has a glass top.  This is not a magnification type glass top, but it is tempered glass that allows the heat of the sun to pass through in order to heat the black interior of the box.  This glass top is essentially the lid to the sun oven as you open and close this for food placement and extraction.  Inside the box, the unit has anodized aluminum sidewalls and features a leveling tray.  This leveling tray not only allows you to adjust the unit up and down with the rear stand, but it also keeps the food off of the bottom of the oven to allow for air circulation which prevents hot spots.  The inside of the unit includes a built-in thermometer that allows you to monitor the internal temperature.  The box itself is nicely insulated with food-grade fiberglass batting and has a plywood top finish to help with its overall durability.  The outside portion of the box is made of ABS Plastic and has a handle attached to the front to allow for easy transportation.  The back of the box has a built in stand that adjusts up and down.  As we progress through the seasons of the year, you raise the stand during the cooler seasons to more fully align the face of the Global Sun Oven with the sun relative to the horizon.  In the front, the aluminum reflector panels also help to redirect the rays of the sun.  (However, the efficacy of the unit itself is primarily based on proper centering of the unit towards the sun.)  The Aluminum Reflector panels fold up nicely for storage and the back piece has a nylon strap and snap that fit to the front of the unit to secure the panels during transportation.  Overall, the unit is well built and made to last for 20 or more years.  The only thing that I would change could be instead of a top loading system have a rear loading system.  I would love to see an insulated rear entry door.  It would be much easier to get in and out of.  However, this would certainly add to the cost of the system greatly.

As to the food you can cook in the Global Sun Oven, the sky is the limit.  The only thing that you won't be able to do is fry foods (or heat frying oil).  Thesre is not a sufficiently high enough contact temperature to provide this type of cooking.  What about breakfast you ask?  Well, you can actually start this unit as soon as the sun is fully up and light can hit the oven.  Turn the Sun Oven upside down.  Swing the leveling tray around and Voila, you are ready to cook in the morning.  The only problem is that the relatively low ambient temperature outside makes this the least effective time of the day to cook and requires much longer cooking times.  For the most part, count on 1.25x to 1.50x longer in cooking times during the day.  During the morning, it could be up to 2.0x to 2.5x as long.  The best time we have found is to start cooking between 10:00 and 11:00.  If you use the unit as a slow cooker, place the food in it and readjust the unit to face the sun a couple of times to help with the cooking.  Your food will be ready for you in a few hours and will stay warm until you are ready.  Going to work in the morning?  OK, put your food in a pot, face your sun oven to where it will be facing the full sun at about 1:00 PM, put your food in it, and come home in the evening to a warm meal.  It really is that easy!  Need to bake bread?  Pre-heat your oven for 1/2 hour, place your bread loaves in, rotate the oven after 1/2 hour to compensate for the movement of the sun and have wonderful tasting bread in 45-60 minutes.  I know some folks we let their bread rise in the sun oven and then just let it naturally lead into the cooking of the bread.

We use our oven 3-5 times a week.  This definitely sounds like a sales pitch, but food just tastes better in the Global Sun Oven.  There is something wonderful that only the direct rays of the sun provide in cooking.  Meat or chicken cooked in the Sun Oven used as a slow cooker becomes tender and falls of the bone, while maintaining its moisture.  Bread has a wonderful thick crust on the type, with thinner crust on the sides and bottoms.  I always tease my wife that I like her bread better from the Global Sun Oven.  In the regular oven, the radiant heat from the oven creates thicker crust on the sides and bottom of the loaf.  I like the "Sun-Kissed" top crust of the bread for the Global Sun Oven.  We have also cooked casseroles, stews, soups, muffins and cakes in the sun oven.  You can either cook the things you normally like, make up your own recipes for the oven, or scour the internet or books for recipes.  You will never get bored with this stove!
Whole Wheat Bread

Here in the desert region of Arizona this unit typically has a temperature rating of 340 - 380 degrees in the summer and 320 - 350 degrees in the winter on a sunny day.  We have also tested this unit out at over 5,000 feet on a cool day (45 Degrees) and had the unit reach 300 degrees, which is sufficient to cook food and bake bread.  In my conversations with Paul Munsen, the President of Sun Ovens International, the maker of the Global Sun Oven, we have discussed the limitations of the oven in colder temperatures.  On a sunny day in the mid-Thirties, you can reach a temperature of over 180 degrees, which believe it or not is sufficient to bake a loaf of bread.  Not your best looking loaf mind you, but it will cook!

In terms of cookware, we find that the dark, thin-walled enamelware pots are wonderful.  These heat up well and help to collect heat because of their dark color.  For warmer areas, small dutch ovens in the 2 - 4  quart range (without the feet) work great.  These smaller dutch ovens take longer to heat up than thin walled pots, but retain their heat better.  Glass cookware and stonecookware are also wonderful options.  Experiment with these as well.  Avoid white, shiny or metallic cookware.  These naturally reflect light and are slower to heat up.  However, in spite of the fact that traditional bread loaf pans are metallic and shiny, since the bread covers most of the surface, these work fine.

As I write this post, hundreds of these units are being deployed to Haiti in order to provide meals, and more importantly, to pastuerize water, in order to help with the aid efforts to the Haitian people.  Of course, a hot meal is often a luxury in a crisis, but drinking water is essential.  Solarizing water is another in a number of methods to provide potable drinking water.

It is obvious that there are limitations to the Global Sun Oven.  On cloudy or partially cloudy days, the temperature may not be sufficient to cook food.  Thus, a dutch oven and a supply or wood or charcoal becomes important.  However, on sunny days there is no better alternative to cooking than this.  These units are relatively expensive, but the investment can pay huge dividends both now and in the future.  So, don't delay........use a Global Sun Oven Today!

Wednesday, March 2, 2011

Upcoming Sun Oven Cooking Essentials Seminar


Sun Oven Cooking Essentials Seminar - Saturday, March 5th at 10:00 AM. 
(At Fitch Park - 1 East 8th Street, Mesa, AZ)

Paul Munsen, the President of Sun Ovens International, will be teaching an instructive course on how to use the Global Sun Oven.  This class is great for Beginners and Advanced sun oven users alike.  Paul has a great teaching style and always provides wonderful pointers and techniques for getting the best out of your Sun Oven.  Come and get inspired to use your sun oven more on an everyday basis.


Global Sun Oven at Preparing Wisely for 250.$ 


E-mail a friend about this product.


Would you like to receive our weekly email with updates on our upcoming events and store specials? It's free...and its fun!  Contact Troy Adair:  troy@preparingwisely.com