Thursday, June 23, 2011

Gingered Mango Coconut Crumb-cupcakes with White Chocolate


 Who knew that  Freeze Dried Mangos and 

6 Grain Pancake Mix  could make amazing cupcakes?

Well...I'm here to say that we've had some great success with using the pancake mix for more than just pancakes!  

Here's my recipe:

Gingered Mango Crumb Cakes drizzled with White Chocolate

2 1/2 cup THRIVE 6 grain pancake mix
2 cup Honeyville Freeze Dried Mango (hydrate with 1 cup hot water for 10 minutes)
3/4 cup sugar
4 large eggs (or dehydrated Powdered Egg Whites, hydrated to equal 1 cup of liquid)
2 tsp  pure vanilla
1/2 tsp rum or brandy flavor
1 T ground ginger
1 tsp ground cinnamon

Crumb topping:
2 1/3 cup THRIVE 6 grain pancake mix
1/2 cup coconut oil
2/3 cup sugar
1 tsp ginger
1/2 tsp ground cardamom


Directions: Preheat oven or solar oven to 325 degrees. Lightly oil muffin pans and line with cupcake papers. (Yields 24). In a large bowl, combine the hydrated fruit, oil, sugar, egg, vanilla and flavor. Whisk until well combined.  In a separate bowl combine pancake mix, oats, ginger and cinnamon.  Combine the wet and dry ingredients and mix by hand 100 strokes.  Scoop into cupcake cups, filling half full.  Top with crumb topping. To make crumb topping, combine ingredients for crumb topping until it looks like this:
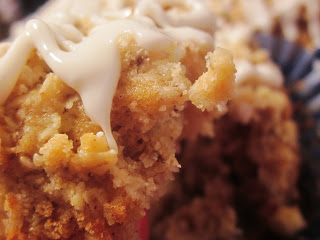
Top cupcakes. Bake 15-18 minutes until a toothpick inserted in the center comes out clear. I drizzle with 8 oz of melted white chocolate when cooled. 


Chopped toasted macadamia nuts sprinkled on top of the chocolate might make me pass out...


There you go! Another way to use your pancake mix! Enjoy! 

Wednesday, June 22, 2011

Buckwheat and Teff Gluten Free Blender Pancakes


I had a request for a whole grain blender pancake that is gluten free. As always, I am happy to help, as I have many friend who deal with the whole "gluten free" issue. So, I thought I'd share that buckwheat is in fact 100% gluten free! It's awesome for pancakes and a powerhouse of nutrition. It's well worth using for pancakes.  So far, I love the soak overnight method best, even though it does actually work to just put the buckwheat in the blender unsoaked. I prefer to soak, as I know that this will aid the body in digestion of the grain.  
Here's my recipe:
1 cup buckwheat (soaked overnight in 3 cups water and drained)
1/2 cup Teff (if you don't know about this whole Super-grain...it's amazing!)
1/2 cup egg whites (this makes a fluffy amazing pancake Powdered Egg Whites can be used, hydrated )
20 drops stevia (see below)
1 tsp lemon or orange zest
1/4 tsp salt

In a blender, all the ingredients.

I LOVE the stevia we carry in the store. It's got a really clean flavor. The advantage of using this, opposed to using sugar is that it won't stick to your griddle...and it won't make you fat. Okay...it's a 100% natural sweetener that doesn't cook out on the griddle so it makes a supremely lightly sweet breakfast pancakes.

Blend on high for 3 full minutes, adding more water as needed to make a smooth batter. I didn't have to use any.
Cook on a lightly oiled hot griddle 2 minutes on each side until cooked through.
Yeah! You'll need some Maple Syrup!
There you go my gluten free friends! Buckwheat-Teff pancakes! Enjoy!

Tuesday, June 21, 2011

Wild Rice is Here!


We got wild rice in the store this week and all I can say is Hooraaaaaay! I was so excited the second I saw the box that I took pictures right away and posted them on our Facebook Page. Yes...I'm a bit of a grain geek, but that's what we like right? Walking geeks of grain? We get our rice from a company called Fall River Wild Rice. If you want to learn more about their rice, you can read about it here.
 The broken variety we got in is a lot less expensive than the full long grain version, but it's flavor is still awesome and just what you would expect in a wild rice. Use up to one cup of the cooked rice in your bread dough for a wonderful contrast of flavor and color. Mill the wild rice in your grain mill for a fine, gluten free flour to add to cookies, cakes and pastries. It will lighten up the final baked good considerably.

Cooking Instructions

Cooking Wild Rice Using the Stovetop Method

Wash 1 cup uncooked wild rice thoroughly. Add to 3 cups boiling water, salted to taste, in a heavy saucepan. Return water to boil and stir. Reduce heat and simmer, covered, 50-60 minutes or just until kernals puff open. Uncover and fluff with table fork. Simmer five additional minutes. Drain any excess liquid. For chewier texture cook less time. Yield: 3-4 cups of cooked wild rice. (For additional flavor, try cooking in beef or chicken broth)

Cooking Wild Rice Using the Oven Method

Wash 1 cup uncooked wild rice thoroughly. Combine with 2 cups water in a covered 2-quart casserole. Cover and bake at 350 F for 1 hour. Check wild rice. Ad more water, if needed, and fluff with a fork. Continue baking for 1/2 hour. wild rice should be moist, not dry. Yield: 3-4 cups cooked wild rice. (For additional flavor, try cooking in beef or chicken broth)

Cooking Wild Rice Using the Microwave Method

Wash 1 cup uncooked wild rice thoroughly. Combine with 3 cups water in a covered 2-quart glass casserole. Microwave on HIGH for 5 minutes. Microwave on MEDIUM (50 percent power) for 30 minutes. Let stand 10-15 minutes, drain. Yield: 3-4 cups cooked wild rice. (For additional flavor, try cooking in beef or chicken broth)


Fall River Wild Rice Nutritional Information from their website:
Wild rice is highly nutritious.   In fact, thanks to the optimal conditions under which it is grown, Mother Nature has blessed this unusual grain with amazing qualities.  Containing more than 12% protein uncooked, wild rice is significantly more rich in protein than common white rice or most other grains.  It is high in complex carbohydrates and is a good source of fiber.  In contrast, its sodium content is refreshingly low.  Wild rice also offers exquisite flavor.  No wonder it has created such a stir among today's health-conscious consumers!  Wild rice is an important component of a balanced diet.

U.S. Wild Rice Nutrients:
Based on 1/2 cup cooked wild rice Amount per Serving:
 Calories320
Calories from fat10
Total Fat 1g2%
Saturated Fat 0g 0%
Trans Fat 0g0%
 
 Cholesterol 0mg0%
Sodium 10mg0%
Total Carbohydrate 68g23%
Sugars 1g0%
Dietary Fiber 6g24%
Protein10g
 
Vitamin A0%
Vitamin C
0%
Calcium
2%
Iron
10%
* Percent Daily Values are based on a 2,000 calorie diet.


We have it for 5$ a lb, in a 5 lb box. If they sell fast enough, we will order more and keep them in stock.

Friday, June 17, 2011

Grain Surgery-- Basic Grain Identification 101


After last nights bread class at Preparing Wisely, I realized it would be a good idea to start posting a lot more Grain education.  It's an amazing area to expand your culinary know-how.  


Are you befuddled? Many would look at this collection of grains and wonder what the heck-fire they all are and what to do with them! Well, never you worry! Chef Tess will help you get a grasp of basic grain surgery! If you missed some of my most basic recipes for grain along with many tutorials, look here . We'll be doing a lot with whole grain...a lot more than you've seen! I'm also going to be referring you to my friend Chef Brad Petersen, since I'll be working with him and his whole grain flour line a lot more (Details to follow...)


I'm starting today with just showing what the grains look like and then we'll cover how to cook with them more in depth. I hope everyone is okay with learning this step by step. I think it's a good way to go.


 Let's start at the very beginning...a very good place to start.  Oh have mercy. Try not to imagine me in the Sound of Music with a gaggle of kids in front of me wanting to listen to me strum my guitar. Instead...think of the smallest grains of sheer AwEsOmeNeSS...and you will have these two buddies.  Auntie Amaranth and her friend Teff.


This is Amaranth. It's one of the smallest grains out there. Amaranth! Pop it and you're addicted...like crack..but healthy. See, I say popping amaranth and it sounds like a new drug huh?  Well, if so...it looks like this.
 Yet smaller is Teff. Teff came to us from Ethiopia where there are several thousand wild varieties. We only have two colors so far...but it's awesome stuff. 
It also takes 150 grains of Teff to equal on grain of wheat...so it's smaller than heck! Heck is small...


Pearled Barley is the most common way to find barley. My favorite recipes for barley are  found here: whole grain barley.


 Hulled Buckwheat and Unhulled buckwheat (dark below) Buckwheat is actually not related to wheat at all and is 100% gluten free.


 Brown Jasmine Rice.


 Now, if you saw all these grains in a stack, could you tell by looking, what the names of the grain are?


Kamut   Khorasan wheat is 1/3 longer than regular wheat and high protein. Excellent for making pasta and bread because of that protein! Plus, look how it is almost gel-like in it's appearance! noodle mix is a great place to start.

 Look how long Kamut grains look next to soft white wheat!

Oats look a lot like wheat, but are long and thin, almost like a grain of rice.  Oat groats like below, are unrolled. There are many people who have never seen a piece of oat that isn't a rolled oats.


 Soft White Wheat is recognizable in two ways, it's got a short grain and it's not gelatinous in appearance.


 How is that Spelt ?  Many people with an allergy or intolerance to common wheat can tolerate spelt even though it is an ancient form of wheat. Why? It hasn't been genetically altered as many of our modern wheat has.


This is classic Hard Red Wheat. It's most famous here on the blog in the Sprouted Wheat bread tutorial and the sprouted wheat tortillas. 


whole grain quinoa. Pronounced Keen-wah... Quinoa comes in Black, Red and White. How to Cook it! 


Flax Seed


Popcorn


Rye

 Classic Rye bread


Black and White Chia seeds! See the scoop on this super grain :whole grain chia 


Corn AKA field corn...corn nuts are a great place to start but you can also lean how to make masa in the homemade corn tortilla tutorial, masa is also amazing for  tamales!


Millet is yet another amazing grain. Check out how to use it the section: whole grain millet

sorghum 

For more powerful grain education, visit my friend Chef Brad! The last time we spoke, he asked me if I would be willing to try out some of his new flour line and share them with you folks here on the blog! Now isn't that nice?! Even nicer, his new TV show! is on the BYU channel. Word is he gets to do 32 more episodes...and asked me if I would be a guest chef upcoming! WOW! Now, we are both chef Petersen, but don't be confused...he's way more famous for grain. He told me he's also coming out with a package of grain samples so people  will always be able to get smaller samples of the grains before purchasing them in bulk. I think he should call them "Home Grain-Surgery kits." I don't think he will though. I for one, will always be the whole grain  Bread and Rolls gal...with ya know, all the other insane things I do. Thank you Chef Brad! I'm looking forward to that flour...and the show!

Get your grain surgery education finished so we can do some serious damage. Seriously!
Now, imagine what you can do when you know how to use the healthy grains and also have learned all the 
Culinary Herb and Spice use and remedies from my blog here! Won't that be a powerful day?!

There you go. 

Wednesday, June 15, 2011

Bold Better Bread Workshop & Tutorial by Chef Stephanie Petersen ( 101 on Whole Grain Breads)


Begin by knowing what Great Bread Really Is
I am the daughter of a woman who believes in great bread. It is in my roots and has been a skill she  taught me from the time I was small. Her first degree is in Home Economics Education and she was, and is  always, great at teaching the science behind bread and its composition. It came in quite handy during my Pastry classes in culinary school. It also has come in handy as I worked in the pastry shop at the Phoenician resort, running a bakery, and running my own home kitchen. Understanding the basics of wheat flour can change the way you not only make bread, but also cakes, cookies, and pastries-as well as thickening puddings and sauces. I  will be focusing on wheat flour specifically. I personally have a lot of experience, but do not, by any far stretch  of the Imagination, consider myself an expert on the subject. I do however; hope that my experience will help  others in developing their own skills in this wonderful area that is quickly becoming a lost art. I will be  covering five general areas in this workshop. They are, the qualities of good bread, Equipment Necessary,Ingredients, Temperatures, and Dough Handling Skills. I will be covering basic sandwich loaves in this class, so fancy loaves will be later.

Learn to Know Good Bread
General Appearance


Shape- symmetrical in shape with good volume. It is smooth on top with no bulges or lumps. It has a well rounded dome showing good "oven -spring". It has an even "shredded break around the sides of the loaf, just above the top edge of the pan.


Oven Spring-
The quick raising that takes place during the first ten minutes after the bread goes into the
hot oven. Oven spring happens before the heat sets the cell walls and before the bread starts to brown.


Color-
 The color is rich golden brown on all sides, the top may be slightly darker brown than the sides or bottom of loaf.


Slice Size- slices cut from the center of a well shaped loaf are very little larger than those cut near the  ends. A well shaped loaf gives a slice of bread which measures about the same both directions.


Crust - On high quality bread, it is thin, crisp and tender.


Crumb-
Color of  wheat bread is uniformly cream tan. Texture shows moderately small, rather uniform cells with thin cell walls. Good bread is free from steaks or extremely close grain. The freshly cut surface has a velvety feel , both to your fingers and to your tongue. As you press the crumb it is soft, elastic, and  springy. There are no hard spots or knots in the crumb of high quality bread.


Flavor- 
is rather bland. It has the sweet nut-like flavor of the wheat. Good bread has good eating quality, even when it isn't still warm! Both the flavor and texture combine to make good eating quality. It is not yeasty, salty, or sour (except in the case of sourdough!).


Keeping Quality
Good bread stays fresh a reasonable length of time and does not dry out or get stale
quickly. Do not store in the refrigerator as this will actually hasten the staling process.


Equipment- Good equipment will help you with the whole process of bread making more efficient!
*Measuring cups
*Measuring spoons
*Spatula or straight edge knife for leveling
*Pans or bowl to mix and store all ingredients
* Digital or meat thermometer
*Large bowl for mixing
*Mixer-if you use one, I prefer Kitchen Aid but honestly I mix by hand in a *FOOD GRADE* plastic bucket and it works wonderfully!
*Straight sided crock (to hold fermenting dough) -An "earthen ware" bowl or crock keeps the
temperature more consistent than a metal container. It also is easier to judge the volume increase of the dough ina straight sided container than it is in a round bowl. This can also be said of the bucket method.
*Wooden spoon or rubber scraper
*Pastry brushes
*Plastic wraps, to cover dough during rising to prevent drying
"sharp knives- for cutting dough at molding time
*Standard size loaf pan- 8 inches long, 4 inches wide, 3 inches deep.
*Cooling Rack
*Timer


Why a standard size loaf pan?
This size pan (8”x4”) will permit a well shaped loaf. It gives a slice of bread which has the same  dimensions both directions, just right for the toaster. The baking time given with these recipes is bases on a standard size loaf pan. If the standard amount of dough goes in a larger pan it makes a poorly shaped loaf, which is fat and squatty with no oven spring. If you use a larger pan and put more dough in it, you will still have a poorly shaped loaf. The larger pan is to wide to permit an evenly rounded dome on the top of the loaf. The spread is too great, and the dough collapses in the middle.


Collect the Right Ingredients


Wheat flour- the main ingredient of all my bread in this workshop. I prefer Wheat Montana Prairie Gold Whole Wheat bread flour. It's my standard of excellence in all honesty. That or King Arthur White Wheat. If you have a wonderful grain mill (Preparing Wisely carries the best!) you can make perfect flour from hard white or red wheat for homemade bread. The hard wheat makes the best bread. Period. 


Liquid- flour dries out quickly in our dry climate. We need more liquid in proportion to flour to keep the dough soft enough to make good bread.
Milk- bread made with milk has more food value
Shortening- basically any fat, this contributes to a tender loaf
Salt- not just for flavor, it actually regulates fermentation of the yeast, as well as enhances the gluten
Yeast- fresh, dry or sourdough starter-this is what makes this baby rise!
Sugar- natural sugar feeds the yeast and adds to its action.


Watch Temperatures
*use cool water to soften the yeast.
*Active dry yeast will d ie if exposed to temp. Over 110 degrees!
*cool the liquid to before a d d ing the softened yeast to the dough (scalded milk 85 to 9 0 degrees !)
*85 to 90 degree rule- keep fermenting dough at 85 to 9 0 degrees for uniform rising and best yeast action- it won 't taste sour or yeasty. Fermentation is necessary for the gluten to become smooth and more elastic , so it can stretch further and hold more gas.
*Bake bread at 400 degrees- This high temp at the beginning will stop the yeast action and set the cell walls.
*Be sure to preheat! Those first fifteen minutes are critical!
* Lower the temperature to 350 degrees after the first 15 minutes-this will prevent the out side from getting too brown before the middle is cooked.
*Store bread-cool storage, tightly wrapped. Wait until loaf is cool before wrapping or it will get soggy crust.


Proper Dough Handling Techniques--
Practice Easy Kneading*
*Avoid too much dough
*Keep dough soft
*Learn to knead effectively using the push from your shoulders. Use palms and heels of thumb instead of fingers. We will discuss kneading in a bucket as opposed to using a table.
*When kneading is done , form into a ball and put in to a lightly oiled crock. Cover with plastic wrap.
Keep dough at 85-9 0 degrees until ready to punch down.
*Punching is not hitting the dough; so much as it is deflating the dough of gas , relaxing the gluten, and equalizing the temperature.


Discover the ripe test -
*do not let dough get too light before first punch down. When cell walls have stretched too far, they will break and effect the texture of the bread.
*The dough is "ripe" and ready to be punched down when:
1. Hole made with finger stays in the dough without closing in.
2. Small creases show on walls of the hole.
3. Bubbles or blisters appear near edge of hole.


This is known a s fermentation, or the process by which yeast acts on the sugars starches in the dough to produce carbon dioxide gas and alcohol. An under fermented dough will not develop proper volume and texture will be course. A dough that ferments too long or at too high a temperature will become sticky, hard to work, and slightly sour. Again, gluten becomes smoother and more elastic during fermentation, so it can stretch further and hold more gas !! Don't skimp on this process .


There is not any magic chemical, yeast or mixer that will replace the fermentation process and it's ability to change the gluten. EVER. Don't be fooled into buying something you don't need. I'm a professional and have never used them for my bread. If you're willing to wait for good bread, it will come to you without the fake "helpers". Whole grain bread can be made on a budget without a fancy mixer! It's the technique, not the machine that make a great baker! 


Develop Skills in Molding
*Do not put fat on hands or work surfaces before molding loaves, Fat on hands will leave streaks of fat in the dough and the dough will not seal properly. This will leave cracks in your finished loaves.
*Use very little, if any, flour on work surface, More flour causes heavy streaks of unfermented flour in your finished bread/
*Roll out the dough, fold in thirds, and then roll into loaf This "stacks the structure" of the gluten and  makes for a very pretty loaf.


Plan to Bake it Right
*Put dough which has been cared for properly in the oven only when it has risen sufficiently.
*Have the oven hot enough when you put the dough into it! Heat to 400 degrees for plain bread (350 for high sugar/fat breads). Drop the temperature to 350 degrees after the first 15 minutes. This high temperature at the beginning will stop the yeast action and set the cell walls so the bread will not get to light.
Is it Done? A good trick to test the doneness of bread is when it reaches an internal temperature of 170-180 degrees with a meat thermometer.


©This Chef Tess Tutorial is a copyrighted production of Stephanie Petersen who maintains the express right to copy, distribute and adapt the work. Express written permission must be received from Stephanie Petersen prior to copying, distributing or adapting this work in either written or electronic format, whether for profit or non-profit purposes. chef-tess@hotmail.com

 Printable online PDF is here