Monday, March 28, 2011

How to Use Tomato Powder

Last week I did a segment on  Valley Dish making a classic family favorite of ours. Eggs poached in tomato sauce.  I can't even tell you how much fun I had adapting this recipe to use...tomato powder! 

I did a post on Eggs in Tomato Sauce...and World Peace and in it I shared this  Israeli Egg dish called shakshuka. It seemed time for me to adapt it using food storage, since I loved it so much!   It also seemed like a perfect time to introduce folks to the basic "how to" on Tomato Powder  tomato powder.  Each #10 can has almost 50 1/4 cup servings, so it's very good for maximizing your space in food storage situations.  

 I had to giggle when one of my dear friends said to me, "What the heck-fire do you do with tomato powder?!" Well...I'm here to tell you that you use it anywhere you use tomato paste, tomato sauce, or tomato juice.  The perk is that it is shelf stable for up to 10 years! So no more throwing away cans of tomato sauce that have gone bad, burst, or had the acid eeek through them.  


Right off the can of Thrive Tomato Powder  it says, "Substitute  Tomato Powder in any dish that calls for tomato paste or sauce. It's perfect for stews, soups, Italian sauces, caseroles or pasta. Easily create homemade spaghetti sauce or put together a steaming soup with tomato powder. THRIVE Tomato Powder can be rehydrated with a ratio of 1 part powder to 4 parts water, though this ratio can be altered to reach desired consistency for various recipes."


1⁄4  cup + 1⁄2  cup water= 6 oz.tomato sauce or 
3⁄4  cup tomato paste


 1/4 cup Dehydrated Onion, 1/4 cup dehydrated bell pepper (available in the store), 2 tsp granulated garlic.


Added 1 tsp cumin, 1/2 tsp black pepper (fresh ground).  I store my spice seeds whole so the shelf life is about quadruple what the ground spice shelf life is.  Just a handy little tip.  Added 1T paprika.
Add the spices to 1/2 cup tomato powder and 2 cups water for a thin tomato sauce.

I poached the 8 eggs in the sauce combination about 12 minutes and sprinkled generously with Kosher Salt...The Real Stuff sea salt.
Use tomato powder anywhere you use tomato sauce. From Pizza to ketchup...it's a great way to add tomato to your food storage!


It would be easy to make a meal mix using the 1/2 cup tomato powder, 1/4 cup onion, 1/4 cup bell pepper, 2 tsp garlic, 1 tsp cumin and 1/2 tsp black pepper. Put in a half pint jar and seal. To use for dinner:

 Just add 2 cups water until well combined.  Put in a pan and cook over medium heat, cracking eggs into the tomato sauce and cooking 12 minutes.

Friday, March 25, 2011

Using Freeze Dried Fruit to Make Jam?! YES!


Now seeing that my teaching next week will be basics on homemade jam and canning safety, I had to do some experimentation. You may ask, "Can luscious homemade jam really be as simple as adding water and a few basic ingredients...and yet be so far above most people's grasp?" I wonder that exact question. Sometimes I wonder if I'm just too "simple silly". I hope I am. I hope that when folks read my words of wisdom and sound understanding that they will feel empowered to make wonderful things. Now...that being said I don't know how to say this...but this raspberry jam was made out of a little honey, some freeze dried raspberries and some pectin. Why freeze dried? Well...just for the danggum-fun-of-it-all. Honey...because I found this yumm-a-licious honey made from my native Sonoran Desert Blossoms...and I was a happy girl.

For argument's sake, let's just say that perhaps raspberries are out of season and I have a can of freeze dried fruit just laying around my house. If I don't have to spend money...even on a bag of frozen berries...I won't. I'm a tight wad. There. I said it. I like freeze dried fruit for making muffin mixes and cake mixes. Plus I saw these at the Preparing Wisely store I would be teaching classes at starting next Tuesday...and I was curious if it could be done. So...that being said, I got a can.

They look really crazy freeze dried...but the only ingredient in the can is raspberries!

Chef Tess Raspberry honey jam
4 cups freeze dried raspberries (or frozen work)
1 1/2 cup honey ( I love the dessert blossom honey)
2 cup water (only add water if using freeze dried berries)
1/2 cup UltraGel or 1 box (1.59 oz) low sugar pectin
Combine all ingredients in a pot for cooked jam except the UltraGel. This hydrates the berries and they look remarkably like what they are...real berries.

Bring to a boil and cook 5 minutes. Whisk in the ultra gel or pectin. Return to a boil and cook a minute more.

Process in sterile half pint jars in a boiling water bath canner for 10 minutes at sea level.


Freezer jam is even easier. Simply add the honey, water and fruit together. You can also use agave nectar in place of the honey if you need lower glycemic or vegan sources. Use freezer pectin instead of low sugar pectin. Ultra gel works in both applications (cooked or freezer jam).

Once the berries have absorbed the water, add the pectin or ultra gel. Stir a minute or two. Freezer pectin will take about 10-20 minutes to gel. Ultra gel will set almost instantly. Transfer to freezer safe containers. Keeps good up to a year in freezer safe containers.
There you go. Fast easy jam even with crazy dried fruit. Who knew?! Now don't you just want to come to my jam class next week?!
Call Troy or Tracey to save your spot.
Preparing Wisely
(480) 964-3077

Wednesday, March 23, 2011

Homemade Instant Pudding Mix


 Today I wanted to share a little information about using modified food starch for mix making. Thanks once again to Troy and Tracey at Preparing Wisely for sharing this cool stuff with me. This is called Ultra Gel. It gets thick in hot or cold liquid so it works amazingly well in instant pudding mix. I love that I don't have to cook the pudding, even though I could if I wanted to do so. Sometimes I love getting that cooked pudding skin...but most of the time when I'm making pudding I want it fast. My Father in law Mr. Putt-Putt is eighty something...and he loves his pudding cups. This saves us money. Fair enough right?

It can be used to replace the starch in any of the mixes I have on my blog including:
Cream Soup Mix at a fraction of the cost
Homemade cream of condensed soup replacement
Gravy Mix made easy

Nutritionally it's pretty low calorie and carbohydrate.
It's gluten free but not corn free. It can also be used in sugar free jam. Really!

It holds well and, unlike regular corn starch, it keeps it's thickening power after freezing.

For instant pudding I wanted something with about four ingredients, instead of the list found on a box of store purchased stuff. I try to stay as natural as possible. You know how I roll right? Well this is what we have come up with.
Instant pudding mix:
1/2 cup sugar or sugar free "spoon-able" alternative
1/3 cup ultra gel Ultra Gel
1/8 tsp salt
1/8 tsp LorAnn flavored oil of your choice (*butterscotch, vanilla, butter cream...you name it.)

I happen to use vanilla infused sugar on a regular basis for this. I keep vanilla beans in quart jars full of sugar. After about 3 weeks, the sugar has a very nice vanilla flavor. Yes...that is a vanilla bean sticking out of the top of the sugar...not a worm. Zoinks. That would be nasty.
To make into pudding:
2 cups cold milk or soy milk

Whisk the pudding mix into the milk and chill 10 minutes. Serve cold.

It will be about this thick at first. The longer it sits the better the set.


Other flavors:
*Pistachio pudding, add 1/4 cup fine chopped pistachio and 1/8 tsp pistachio flavor
* chocolate pudding, add 1/4 cup cocoa to the mix
*caramel pudding, use brown sugar instead of white sugar
*coconut cream pudding, use coconut milk instead of milk
*lemon pudding, use 1/2 tsp lemon zest and juice of 1/2 a lemon in finished product.
There you go.

Tuesday, March 22, 2011

Super Chia to the Rescue!

I know you've heard the commercials for years about the chia pets where a person hydrates these seeds and spreads them on a clay figurine and then watches them grow into fluff. Cha-cha-cha-chia! Well...now you have reason to hydrate them and add them to your life! My first exposure to these little wonders happened when my brother in law, the mortuary guy, came home from a funeral. He said there was a bishop at the chapel who had lost eighty pounds by adding chia seed to his diet. He was not the guy who died. He was the guy who decided to take his own health into his own hands...When I bring this up with the chia, I'm not talking about a gimmick diet plan here, just sensible use of a wonderful grain. Imagine my joy at finding the Chia Seeds in a 1 lb bag at a really low price (just around  8$) at our local Preparing Wisely store. I wanted to try it out. Well...the owner Troy was kind enough to show me how to use them.


According to Troy Chia was cultivated by the ancient Aztecs, and was honored as a super food. Chia is one of the best plant sources of beneficial Omega-3 oils, especially a-linolenic acid (ALA). Scientific Research on Omega-3 and other essential fatty acids (EFA) continues to prove that EFAs support cardiovascular health, comfortable joint mobility, immune system function and overall cellular energy. Chia is often stored for long periods of time as a Survival Food, since it does not quickly turn rancid like other sources of Essential Fatty Acids. Chia is high in vitamins and minerals such as magnesium, potassium and phosphorous. It contains many antioxidants, including significant levels of caffeic acids, quercetin and flavonols. Chia is an excellent source of high molecular weight soluble fiber, which supports healthy bowel function.
When Chia is mixed into a liquid, it forms a thick mass due to its high content of beneficial mucilages. This slows the digestion of carbohydrates in the digestive system, leading to a feeling of fullness, and reduces the spike in blood sugar that often accompanies the ingestion of carbohydrates.
Looking at the Nutrition Facts and Analysis for chia seeds revealed a glycemic index of 1. That's amazing for a grain!
So, I decided to give it a try as a drink. 2T mixed into 2 cups of cool distilled water.
The seeds make this crazy suspension that made my little boys say I was drinking frog eggs. I don't care. I was now sucked into the new world of chia.
I drop one or two droppers of stevia natural sweetener into the chia and water mixture and drink it like a thin pudding. I've had it everyday for breakfast for the last two weeks. I've lost six pounds. So...I'm going to keep taking chia shots. They're all natural and a wonderful way to add fiber and wholesome goodness to my life. Thanks most especially to at Preparing Wisely for having these bags in the store! I'm also down to my last few tablespoons...and that means I'm going to see them soon. Hooray for chia! Try them out. I love them!

Monday, March 21, 2011

Black Quinoa 101--how to cook it and where to use it.

I want to share something amazing, as I know that a lot of people have "toppers". That's a sauce with veggies or whatever...over rice.    It is one thing to have the freezer meal rice topper on rice, but another world to have it on a whole grain like quinoa or barley. I'm a huge fan of the Solar Cooked Fire and Rain Barley Pilaf as a base for soup or as a meal on it's own if we're talking grain. I have a long way to go adding a ton more on the subject of whole grain here on the blog. I hope you don't get sick of the new options. Variety is good. Even with grain, as it will nourish your body different ways and add another level of appreciation for good food. More than likely, my kids will at least be able to visit other families around the world someday and not freak out if they are served a meal they don't recognize. That's always good for foreign relations. So is this. Bolivia...I love you. I love your Black Organic Quinoa . Quinoa ( pronounced "keen-wah") is heaven. It has been cultivated in the Andes for more than 5000 years! Locally referred to as the "mother grain", it kept the Incan armies strong and robust. It's a protein powerhouse and considered one of the best sources of protein and amino acids by the United Nations. It's gluten free. Plus... look at it. It's just gorgeous and looks like Fall. Doesn't it? I fell in love the first grain that I ate. It is slightly nutty flavored and mild with amazing texture. Uncooked it looks like this...

The main thing to remember with quinoa cookery is to always rinse the grain. Always. It isn't optional like rice rinsing is. Quinoa will be huge wads of bitter unhappy junk in your mouth if you don't rinse it. I'm just saying...you've been warned. Put the grain in a strainer that is fine enough that the grain won't wash out.


This is how you cook it:


It will look like it has sprouted when cooked. It isn't sprouted. Just cool.

Because herbs freeze beautifully, I add a few from the garden.
This batch ended up like a fusion of Provence France and the Andes mountains. If that's possible--I'm eating brie with it. I'm using herbs that are traditionally combined for a classic French meal. Dill, parsley, tarragon, rosemary, thyme, basil and oregano. This with a subtle hint of lavender petals and some fresh squeezed lemon juice. Salt and pepper to taste.
Personal taste will vary and your preference for herbs may be different. As a general rule, I use about 1/4 cup chopped herbs to 2 cups cooked grain.
Put 2 cup portions in pint size freezer bags or containers and remove as much air as possible. Freeze laying flat for maximum freezer space.
Defrost in the fridge or in the microwave out of the bag. Heat 2-3 minutes microwave or add to your favorite soup or casserole in place of rice.

There you go. Explore a new grain this week.

Friday, March 18, 2011

Adding Fruit and Jam to Your Food Storage Changes...Everything.


Basic Home Canning of Jam
and Canning Safety 101

Free Class March 29th at 9 AM here at Preparing Wisely
Store
Are you a little behind on the Basic sanitation and food safety for home
canning that your GRANDMA didn't know about? Things have changed!
There are many unsafe canning methods and myths out there that could
prove to be potentially lethal! Learn what home canning specialists and food
safety experts think you need to know to keep your family SAFE...so that
your food storage will preserve life...not shorten it. Empower yourself with
knowledge!
This class will cover basic jam and fruit spread canning safety using a water
bath canner. It will be taught by Chef Stephanie Petersen. Her classes are
always full of wonderful information, laughter and food! Come join the fun!
Save your spot today!


Thursday, March 17, 2011

Sour Cream Cornbread Mix Using Your Food Storage

What is it about old school chili  to make a gal homesick and happy at the same time? Really nothing seems to invoke those feelings of home like that comfort food from my child hood. Maybe it's the warming influence of the beans. Hee hee.
Ironically, it's not the same without a nice rich cornbread to drizzle the chili over is it? So here's my recipe for cornbread mix. First you will need to have some of my Homemade Bisquick.
Chef Tess' Sour Cream Cornbread Mix

1 cup Homemade Bisquick
3/4 cup cornmeal
1/3 cup sugar or sugar free replacement
1/3 cup powdered sour cream Sour Cream Powder 
2T powdered egg Whole Egg Powder 

Combine all dry ingredients. At baking, pre-heat oven to 425 degrees. Combine cornbread mix with 1 cup water. Stir until just combined. Pour into a greased 8 inch by 8 inch cake pan or a 9 by 5 loaf pan. Bake 20-25 minutes until a toothpick inserted into the cornbread comes out clean.
Drizzle with homemade chili. Or for breakfast, our all time favorite is to soak it in butter and maple syrup. Oh have mercy. It's comforting to the core.

If you prefer to make cornbread without a mix, may I suggest my lovely post on Scratch Cornbread from the early days of the blog. Gosh it's a classic.

Tuesday, March 15, 2011

Whole 7 Grain Bread Baked in a Solar Oven

I taught a class at Preparing Wisely today and wanted to share a few of the tips that I shared with the many students who were in attendance.  We focused specifically on whole grain bread.  
Hard Wheat, Soft Wheat, Oats, Rye, Barley, Triticale, and Spelt make up the whole grain mix we used.
It is specifically the  7 grain rolled cereal from Wheat Montana.  It has long been a favorite at our home because of how hearty and flavorful it is. Mildly nutty and just a nice filling cereal.  Cooked it is outstanding.  In this bread...it acts as a moisture retainer.  This recipe makes 4 loaves.
You will need:

Step one:
6 cups rolled 7 grain cereal (or just rolled oats)
5 cups warm water (not too hot)
1 cup honey
1 cupShortening Powder  (or olive oil)
1T plus 1 tsp instant SAF Yeast

Allow yeast to activate and grain the chance to absorb moisture 30 minutes.

In a separate container combine:
6 cups Wheat Montana white wheat flour (I mill mine from prairie gold)
2 tsp Real Salt 
1/2 cup Honeyville Vital Wheat Gluten


Stir 3/4 of the flour mixture into the grain water mixture until a thick paste is made.

The dough will appear very moist.  Wait 5-10 minutes and allow the flour to absorb water before adding any more flour (if any). This will make a very moist bread.


Knead consistently in the same direction for 7 minutes by hand (or 300 strokes).

Kneading dough in a bucket is ideal in that you have a straight sided container to tell when the bread has doubled in volume. Also, if you were in a camping situation or emergency situation where you didn't have access to a kitchen counter it would give you a sanitary place to prepare the dough. After kneading for the 300 turns, take a minute to wash your hands. 


Touch the dough with your clean hands. If it doesn't stick to your fingers, it is done. You may not need to even add more flour.

There will be visible amounts of whole grain throughout the dough.
Roll dough into a ball.  Place lid on the bucket and allow to raise until doubled in volume, about 1 1/2 hours.


Open your solar oven and place it in direct sunlight.  Oil two NorPro 10" Loaf Pan  

Divide dough into 4 balls. Again, in a camping situation, this may be done directly in the bucket if the bucket is turned on it's side.

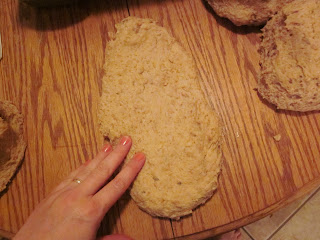
To form a loaf with good structure and nice shape, take the dough and pat it out flat on a surface that has been lightly coated with water. Yes. Water. When working with whole grain, I use water on my counter tops. 
Fold the dough into thirds.

Turn a half turn.

Roll into a tight loaf.

Place in the oiled loaf pan.
Lightly cover the top of the bread with oil. You may also top with seeds if desired. I like to use a combination I use for my "everything" bagels.
It is ready to put into your hot solar oven after raising 45 minutes to an hour.
You can bake it in a regular oven at 375 degrees 40 -45 minutes.

One of the best tricks I've found for knowing this bread is done, is by using an instant meat thermometer. When the dough reads 170 degrees or hotter, it is done.


There you go. Make some whole grain bread in your solar oven...and then send us some pictures! We'd love to add them to our blog!