Monday, July 18, 2011

Four New Convenience Meals in A Jar!


We had a class Thursday night and I added 5 new recipes to the seven meals that I have already shared for the    in a jar that are "just add water". The blessed part of these new additions is that they are still the same homestyle food that my husband calls "normal people food". I think it's a cut above normal...but not so gourmet that it will intimidate my in-laws who prefer mild food.  I don't use a lot of sodium or go too crazy on the seasoning here, so adjust as you need for your family. I like to add more to my personal jars.  
 The best part of adding the new meals is that now we have enough to do a 2 week menu plan instead of just one week. So one can do 24 jars of each meal and have dinners for a "years supply" of dinners...give or take. I know a lot of folks try to keep at least a year's worth of grain and personal supplies on hand for things like unemployment, family tragedy or natural disaster.  It's their own insurance against hard times. As for these jar recipes, when you plan, if you keep it in denomination of 12 it's simple... because canning quart jars come in 12 jar cases! One can be certain it's easy to organize.  Last Monday I added the first of the five new recipes. 
It was 

Creamy Chicken Veggie Casserole in a Jar

 The next four are here today.

Side note...have you ever used freeze dried cheese? It's amazing! It's crazy stuff...and totally real cheese...just freeze dried to preserve it's freshness.  
Meal 1: Saucy Baked Ziti with Sausage and Mushrooms
Saucy “Baked” Ziti with Sausage and MushroomsIn a quart jar:
2/3 cup tomato powder
1/3 cup dehydrated onion
1T Chef Tess Italian Seasoning
1/3 cup freeze dried sausage or sausage TVP
2/3 cup Freeze dried Hamburger or beef TVP
1 cup Ziti (3 ounces)
1/3 cup freeze dried mushrooms
2/3 cup freeze dried Mozzarella cheese (in a snack baggie)
Directions: Place contents of jar (except for cheese) in a covered skillet or pot with 4 ½ cups water. Simmer 15-20 minutes until pasta is tender and sauce is thick. (Solar oven 30-40 minutes covered). Place contents of cheese bag in a bowl and spray lightly with water. Sit for 5 minutes. Uncover cooked pasta mixture. Top with cheese. Cover again and allow cheese to melt, about 5 minutes.Serve hot.

Meal 2: Beefy Spanish Rice
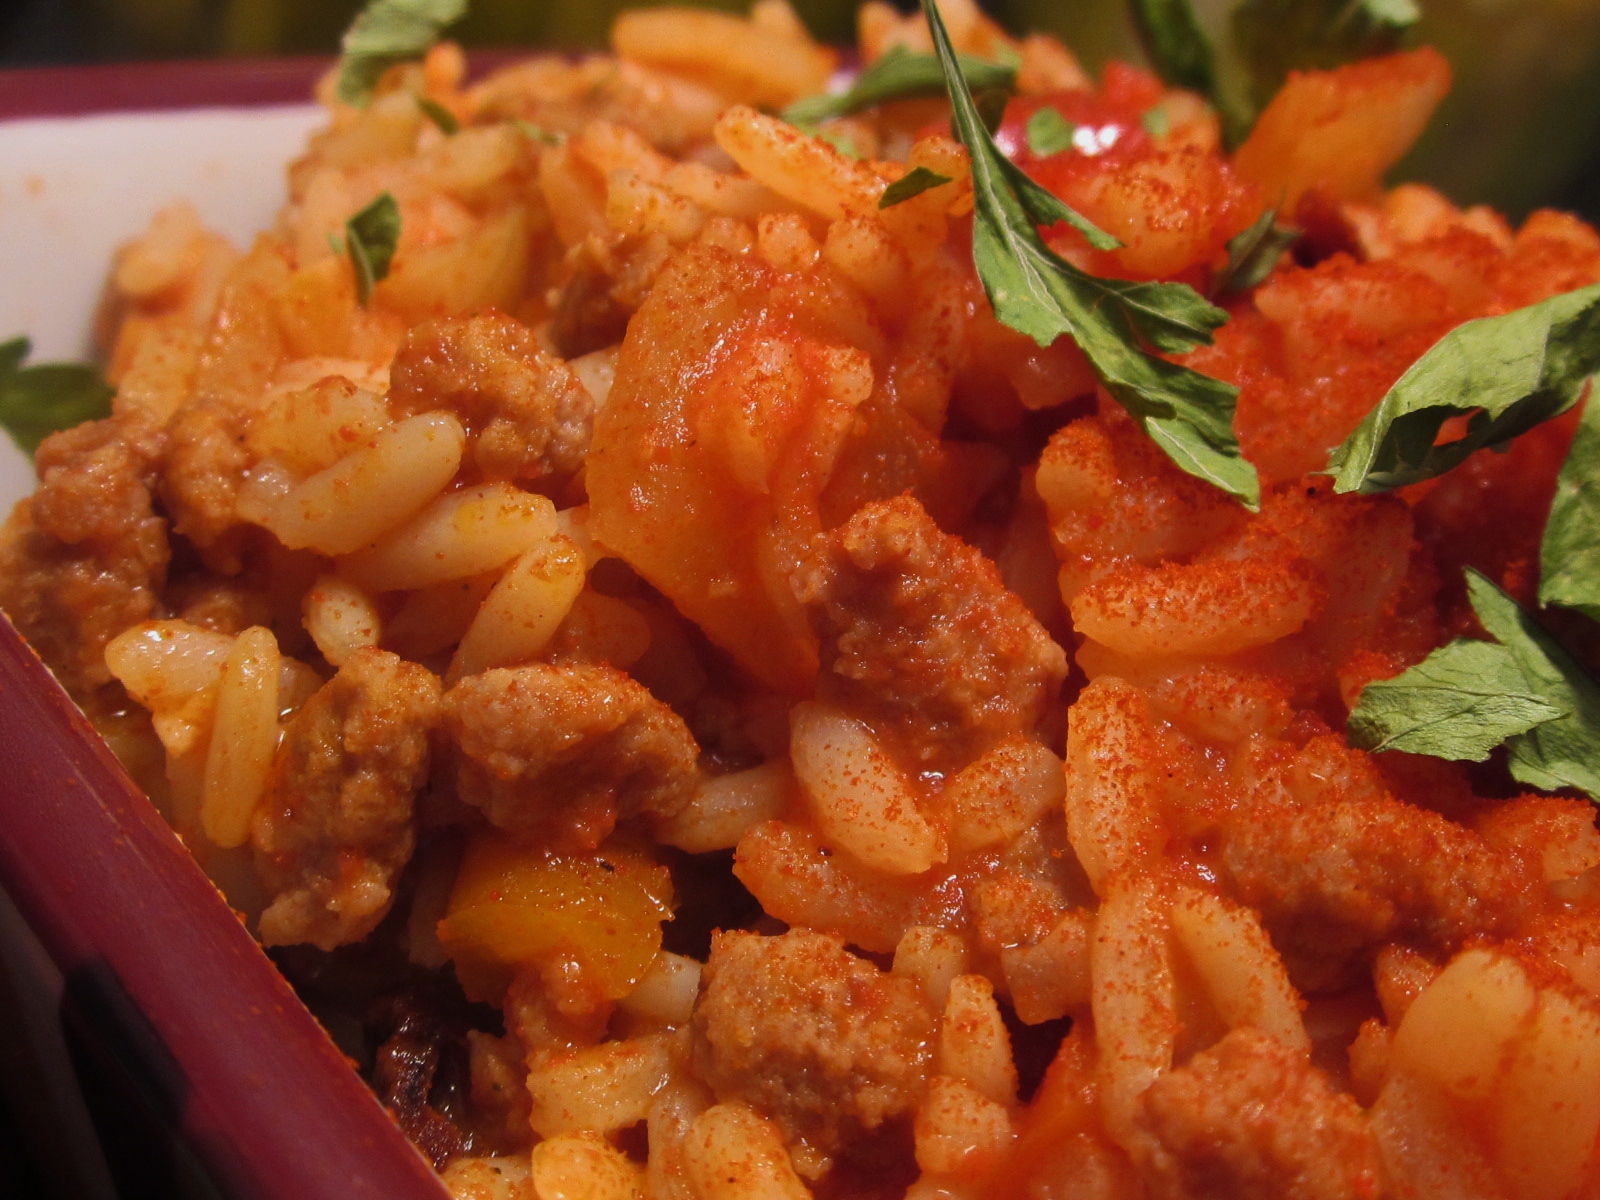
Beefy Spanish Rice
 In Quart jar with oxygen eater:
1 ½ cup freeze dried hamburger
1 ½ cup long grain rice
½ cup Honeyville freeze dried bell pepper trio
½ cup dehydrated onion
1 ½ tsp Chef Tess All Purpose seasoning, 1 tsp dehydrated minced garlic
1 T dehydrated minced ancho chilies
1 ½ tsp salt
½ tsp smoked paprika
¼ cup tomato powder
1 bay leaf
Directions: Add contents of jar to 5 ½ cups boiling water. Cover and simmer low 25-30 minutes until tender. Top with cheese or sour cream if desired.

Meal 3: Been and Rice Fajita Casserole
  
Bean and Rice Fajita Casserole
                                                                                                                 
2 cups THRIVE instant red or black beans
1 cup long grain rice
½ cup Honeyville bell pepper trio
½ cup honeyville dehydrated onion
1T Chef Tess All Purpose Seasoning blend
½ tsp cumin seed
½ tsp oregano leaves (or 1 drop oil of oregano)
1 tsp minced garlic
1 bay leaf
½ cup Honeyville cheese sauce powder
¼ cup powdered tomato
Place contents of jar in a deep covered casserole and add 6 cups of very hot water. Place covered in a solar oven or conventional oven 30-35 minutes.

Meal 4: Golden Cheese and Sausage Potato Casserole 

Golden Potato, cheese and Sausage Casserole
In a quart jar:
1 cup Honeyville  cheese sauce mix
½ cup dehydrated sour cream
1/3 cup dehydrated onion, 1 ½ tsp dehydrated minced garlic
1 cup freeze dried sausage (or ham)
2 cups (4 ounces) dehydrated hash brown potatoes
1/8 tsp ground nutmeg
½ tsp cracked fresh pepper
1 bay leaf

Combine contents in a deep casserole with 5 ½ cups hot water. Cover 10 minutes. Bake in solar oven 1 hour covered or in the microwave 15 minutes uncovered. May top with additional cheese, crushed corn flakes or crushed crackers if desired.

printable version of all 12 recipes for convenience meals in a jar are Here.

Monday, July 11, 2011

Creamy Chicken Veggie Casserole in a Jar


I will be teaching a FREE class at  Preparing Wisely on Thursday night at 6:30 in Mesa  on  these Convenience Meals in a Jar.   This class is  always well attended and in high demand, especially  in  light of recent emergency events that have happened around the world and the demand people have for good quality homemade meals.  People prepare for family emergencies in different ways. Some prepare for an earthquake, fire or natural disaster.  Some prepare for financially difficult times and unemployment.  Some just prepare meals in advance so that mom or dad are not too entirely stressed out at the end of a hard work day. Whatever your reason for preparing convenience meals, this is a simple method of keeping track of what you have on hand and keeping it an organized location.  This method is one anybody can use. I don't claim the method of planning a menu this way to be mine, I do however claim these recipes as ones I have developed through personal trial and error. We've heard it called a "year's supply" of food. Insuring that should anything catastrophic happen, your family will be fed.


Recently someone asked me to write down a few of my recipes for long term storage and what I recommended. I have a method that I like to recommended to  those starting out on food storage use that isn't new, but it was a little bit exciting when I heard it. One plans 7 meals, one for each night of the week and then figured getting 52 of each meal.  My method of containing each meal entirely in ONE  jar is different than others who have planned the meal in a 52 week method, but didn't keep it this simple or concise. I wanted it all in one spot. In this way one would easily be able to have a year's supply of food that a family of four would eat should they need it. One wouldn't  have to search through things to find the corresponding can of meat or sauce to go with the starch.   It sounds "simple stupid"...but sometimes that's how I roll. It's a good simple way to calculate a family's needs. It's also a good way to get back to the basics of what a normal family will eat. Without getting into a lot of canning details and crazy stuff here, I do want to say that I don't want anyone to have to worry about canning meat or rotating cans of beans and vegetables. This gets into methods of pressure canning that some may not be prepared to practice proper rotation or sanitation while home canning. No they are not safe on the shelf longer than one year.  PERIOD. (Please see Home Canning Safety 101 for specific details in this matter) If you would like the original 7 recipes I used, see this post:  here .


  Today I'm adding another casserole that has become a fast favorite here.  I already posted one that's a cheesy turkey noodle casserole. While this one is similar, I realize that sometimes it's the comfort food we serve during times of distress...and I'm planning accordingly.  That being said, this one is different in it's composition and flavor.  It's a lot more creamy and has more vegetables. 


In a quart Jar fit with a funnel:
1 3/4  cups wide egg noodles
½ cup Honeyville freeze dried vegetable mix
1 cup freeze dried chicken chunks
1/2 cup freeze dried peas
1/4 cup freeze dried mushroom slices
2 T dehydrated onions

1/2 cup Honeyville  cheese sauce powder OR my homemade condensed soup mix  
1/3 cup powdered milk
1/3 cup powdered sour cream
¼ cup dehydrated butter


For long term 8-10 year storage, combine all ingredients in a sealed mason jar with an oxygen absorber packet.  These will cause a vacuum seal.  Note...it is important if you are doing these jars to open the freeze dried meat and bottle it again within a few hours. If you're worried about it or want a vegetarian alternative, you may use 1 1/2 cup Freeze Dried Zucchini instead of the chicken. You'll need to add 1 tsp no msg chicken bullion to the mix as well.

The chicken is really cool. 

To Prepare:

In a casserole, combine the entire contents of the jar with 4 cups hot water. Let sit 5 minutes.  Cover and bake in a solar oven at 350 degrees for 30-35 minutes. OR microwave in covered deep dish casserole for 15 minutes.  
While the casserole is baking, I make bread crumb topping. This is optional but adds a lot of texture and flavor. I prefer, when cooking with the solar oven to do the topping on a separate burner or if microwaving...cooking the topping on the stove to crisp it. This saves a lot of time and with the solar cooker, gets a crispy topping I can't normally get.   I'm using  homemade 9 grain ciabatta (if you missed that post it was freakin' fun!).  Put a few pieces in a food processor or finely grind in a hand-powered  processor.
Add 2 T olive oil 1/2 cup of  the crumbs and 1/2 tsp of my Romantic Italian Seasoning
Mmm. Now that's a crumby job right there. 
Put the crumbs in a hot skillet and stir until toasted. How easy is that?! Where you expecting rocket science?!

Remove casserole from the oven or microwave (especially important with microwave to let the casserole sit 10 minutes so it get's thick). Top with 4-5 slices of cheese. I use homemade mozzarella cheese  or you can also use freeze dried mozzarella from your food storage.  Top with crumbs.
Spread out the crumbs.  Cover until cheese is melted. 
Usually while the cheese is melting I saute some fresh green beans to go on the side...
Season them well and drizzle with olive oil...and waaahlaaaa! The casserole is now ready. Brace yourself for the reveal...
The casserole is now ready. Brace yourself for the reveal...

Creamy delicious...not too glue-like and thick...


Are you hungry yet?
Well?

There you go. Make some veggie casserole!

Friday, July 1, 2011

Chocolate Amaranth Bread!

And off we go! Welcome to Amaranth class. I'm chef Stephanie Petersen and I will be eating chocolate until I'm dead and bloated hosting this grand Grain Surgery 101 adventure!  

Amaranth is a supergrain! It's a complete protein. It's in the same family as millet. You all know how I love millet right? Amaranth (below, left) is a very small grain. Teff (below right) is the smallest of all the grains. Amaranth is right there though...very small. 
Added to baked goods when popped, it adds a light texture and nut-like flavor. I'm completely in love with it. Smooches Amaranth.
 I love how it looks in bread. I love how it tastes in bread. I love how it sounds like I'm doing drugs when my kids tell my neighbors, "Mom's poppin' Amaranth again."
For this amazing bread you will need this crazy cool recipe I Adapted from my chocolate bread recipe:


Whole Grain Chocolate Honey Amaranth Bread


12 oz luke warm water (no hotter than 110 degrees) 1 1/2 cups
1T  active dry yeast (or 1 packet)
1/2 cup honey
1/4 cup organic amaranth, popped to equal 1 cup (directions to follow)
1 lb 12 oz whole Kamut flour or whole wheat bread flour ( 5 1/2 cups)
4 (1 oz each) unsweetened bakers chocolate squares (or 3/4 cup cocoa)
1 T espresso powder (or Pero for the Mormon ladies)
2 tsp salt
4 oz olive oil, (1/2 cup butter is pictured but I usually use olive oil)
2 large eggs (1/2 cup)
1 T double strength vanilla
8 oz, high quality chocolate chips


Combine the olive oil OR butter and bakers unsweetened chocolate and melt slowly over a double boiler or in the microwave 15 seconds at a time. Stir often as to not burn the chocolate.
Stir and stir. Try not to imagine yourself as a one inch version of yourself floating away in a chocolate jacuzzi with Edward Cullen...he is fictional character. He will never love you.
In a large bowl, combine the yeast, warm water, honey and about 1 cup of the flour. When the chocolate mixture is completely melted, allow to cool so that it doesn't feel warm to the touch.
Now get out your amaranth.


Pop the Amaranth by heating a large deep pan 2-3 minutes on high heat. Add the 1/4 cup amaranth and stir with a wooden spoon until it pops.
 It will become bright white and take on a nutty flavor. Yah...no comments on my lack of a tan...and my crazy-brain either.
 Isn't it the cutest little mini-pop you ever saw? If I was a Smurf, I'd take this to the movies. In the bread, it gives a nut-like flavor without adding fat and most definitely adding a ton of nutritional goodness!

 Mix the amaranth  into the water flour and yeast mixture. Add the salt, vanilla, eggs and remaining flour, reserving about 1/2 cup of flour. Knead by hand 5-7 minutes until a soft supple dough is formed. It should look like this.

Very little if any flour is needed to keep this dough from sticking to the work surface if you have followed the recipe correctly. Place in a 2 gallon covered bowl and allow to raise about 2 hours, until doubled in size.
Punch down dough.

 Divide the dough in half.
Roll out into a 14 inch by 10 inch rectangle and spread half the chocolate chips onto the dough, leaving an inch around the outside edge. It helps to lightly roll a rolling pin over the chocolate chips to ease them into the dough. Be careful not to push them through, just nestle them in the dough...
Tightly roll the dough into a long log, encasing the chocolate chips. Don't make them longer than your sheet pans. I don't have a huge oven like I did in the bakery...so I had to make them short baguettes...like 16 inches or so.
I had a dream about an alien planet that was all cratered with chocolate chips like this. I think it was after I had eaten too many brownies.

When it is all rolled, be sure not to let any of those little cuties escape. Hey...an escaped nibblet. Ooop. I had to do a mercy eating...just so it wouldn't get burned in the oven. See how benevolent I am.
Place loaves seam side down on a lightly oiled sheet pan or pan lined with parchment paper. You can cover each loaf lightly with plastic wrap or place in an Unheated oven, lightly spraying it with a mist of water. Raise 1 1/2-2 hours, until very fluffy. Remove wrapping or take out of cool oven. Preheat oven to 375 degrees. Take one egg white and 2T water and whisk together in a bowl. Lightly coat the top of the bread with the egg mixture using a pastry brush.
Slash with a sharp knife lightly three times across the top of the bread.
Bake 40-45 minutes or until over 170 degrees with a meat thermometer.


When baked, the outside will be smooth and shiny. The inside will be studded with chocolate chips. Well, unless a few peek out through the slash marks. On a side note...I also like to make little buns with this dough and just put a square of chocolate in the middle of the dough, much like I do for the caramel stuffed sticky buns
There you go.


Don't lick the computer screen. It's not Edward Cullen and it will never love you. Stop poppin' too many amaranth...you freak.


Make your own. There you go. {Evil grin} Don't you want to just try amaranth now?! Come on down. We have it at Preparing Wisely!